Photoshop�����ɐ�(��i)���ǹ���֡�Ӣ��
����(l��i)Դ�� Tutsplus�����x���� Rose �o�҂�����(l��i)��(j��ng)���ʵ����£��ȿ���Ч���D

This tutorial will show you how to use Photoshop's brush settings, layer styles, and adjustment layers to create a fun, bright glazed cookies text effect. Let's get started!
1. How to Create a Gradient Background and Text Layers
Step 1
Create a new 1000 x 800px document, and click the Create new fill or adjustment layer icon at the bottom of the Layers panel to add a Gradient layer.
Create the gradient fill using the Colors #e8d2d6 to the left and #ddbcc0 to the right, and change the Angle to 107.

Step 2
Create the text in All Caps using the font Sniglet, and set the Size to 250 pt.
You can create the whole word at once, or, if you want a more dynamic result, create each letter on a separate layer.
If you are creating the letters separately, make sure to place each one's layer in a group with the letter's name.

2. How to Create and Save a Stroke Brush Tip
Step 1
Pick the Brush Tool and open the Brush panel. Choose a hard round tip and use these settings:
Brush Tip Shape
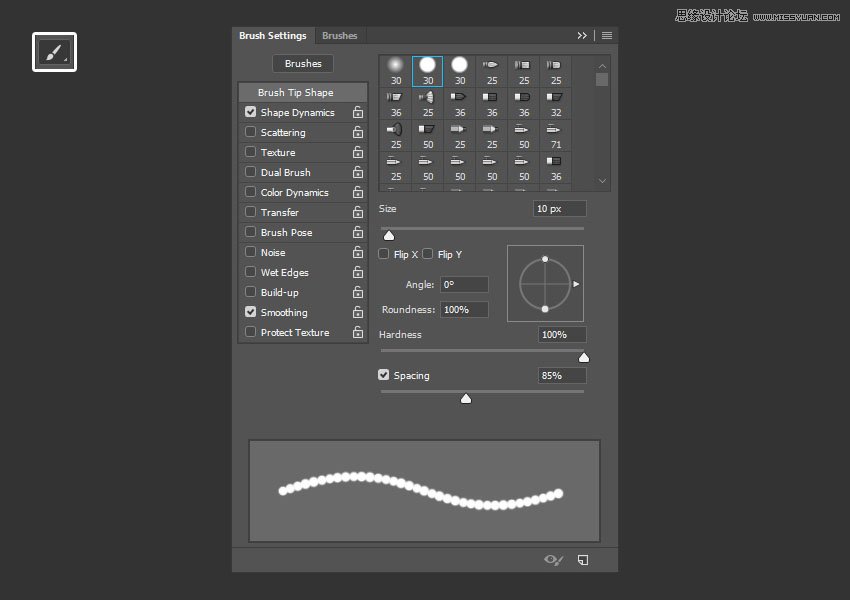
Shape Dynamics
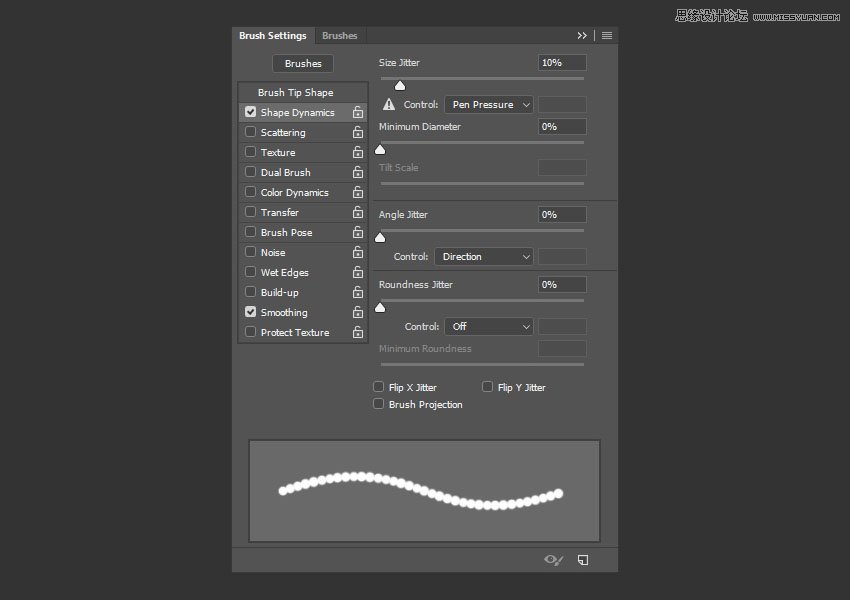
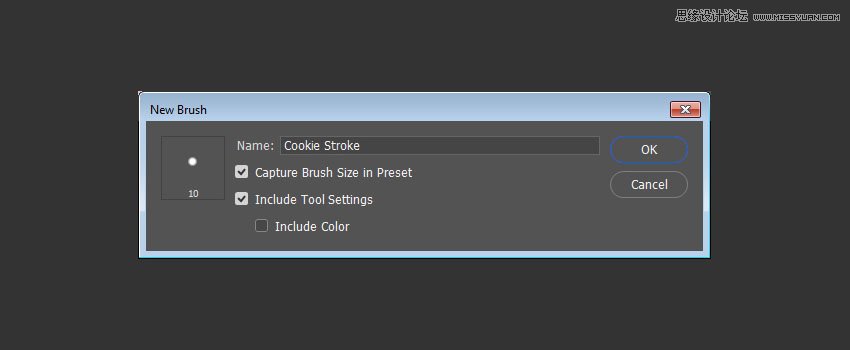
Step 2
Click the Create new brush icon in the bottom right corner of the panel, change the Name to Cookie Stroke, and click OK.
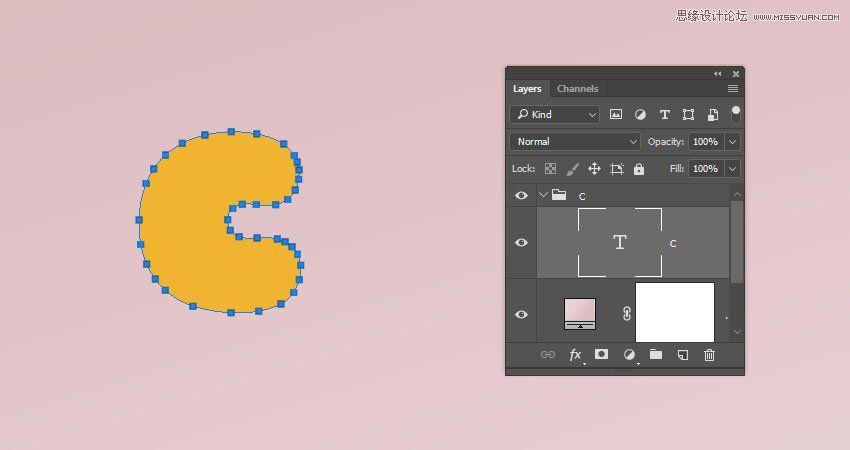
3. How to Create and Stroke a Work Path
Step 1
Right-click the text layer and choose Create Work Path.
 ��ǵ���
-
 Photoshop������(f��)���L(f��ng)�������ƬЧ����Ӣ��2018-04-23
-
 Photoshop�ϳ��L(zh��ng)����(chu��ng)����(sh��)���L(zh��ng)�i¹��Ӣ��2018-04-23
-
 Photoshop�ϳɱ�����Ч�Ľ��~(y��)��(ch��ng)����Ӣ��2018-02-10
-
 Photoshop�ϳɉ�(m��ng)���L(f��ng)���ɭ�ֈ�(ch��ng)����Ӣ��2018-02-10
-
 Photoshop�ϳ�����ʩ��������Ӣ��2018-02-10
-
 Photoshop���������|(zh��)�е�3D���w�֡�Ӣ��2018-01-09
-
 Photoshop�O(sh��)Ӌ(j��)����ȼ��ˇ�g(sh��)�ֽ̡̳�Ӣ��2018-01-09
-
Photoshop������(f��)���L(f��ng)�������ƬЧ����Ӣ��
���P(gu��n)����11882018-04-23
-
Photoshop�ϳ��L(zh��ng)����(chu��ng)����(sh��)���L(zh��ng)�i¹��Ӣ��
���P(gu��n)����13832018-04-23
-
Photoshop�ϳɱ�����Ч�Ľ��~(y��)��(ch��ng)����Ӣ��
���P(gu��n)����34052018-02-10
-
 Photoshop�����S���|(zh��)�����w�֡�Ӣ��
���P(gu��n)����7422018-02-10
Photoshop�����S���|(zh��)�����w�֡�Ӣ��
���P(gu��n)����7422018-02-10
-
 Photoshop�����@�G����3D���w��
���P(gu��n)����14682018-02-10
Photoshop�����@�G����3D���w��
���P(gu��n)����14682018-02-10
-
Photoshop�ϳɉ�(m��ng)���L(f��ng)���ɭ�ֈ�(ch��ng)����Ӣ��
���P(gu��n)����24492018-02-10
-
Photoshop�ϳ�����ʩ��������Ӣ��
���P(gu��n)����8372018-02-10
-
 Photoshop������(f��)���p���ع����w
���P(gu��n)����6532018-01-09
Photoshop������(f��)���p���ع����w
���P(gu��n)����6532018-01-09
