Photoshop�����ɐ�(��i)���ǹ���֡�Ӣ��(2)
����(l��i)Դ�� Tutsplus�����x���� Rose �o�҂�����(l��i)��(j��ng)���ʵ����£�Step 2
Create a new layer on top of the text layer, name it Stroke, make sure that the Brush Tool is still active, and hit the Return key to stroke the path.
Pick the Direct Selection Tool (A), and hit the Return key again to get rid of the work path.

Step 3
Put both the text and Stroke layers in a group and name it Text and Stroke.

4. How to Style a Layer Group
Double-click the Text and Stroke group to apply the following layer style:
Step 1
Add a Bevel and Emboss with these settings:
Size: 7
Check the Anti-aliased box
Highlight Mode:
Color: #b08965
Shadow Mode:
Color: #d3a35e
Opacity: 35%

Step 2
Add a Contour with these settings:
Contour: Half Round
Check the Anti-aliased box.

Step 3
Add a Drop Shadow with these settings:
Color: #762b3d
Opacity: 38%
Distance: 3
Size: 5

Step 4
Add another Drop Shadow effect instance with these settings:
Color: #7d3848
Opacity: 50%
Distance: 15
Size: 25

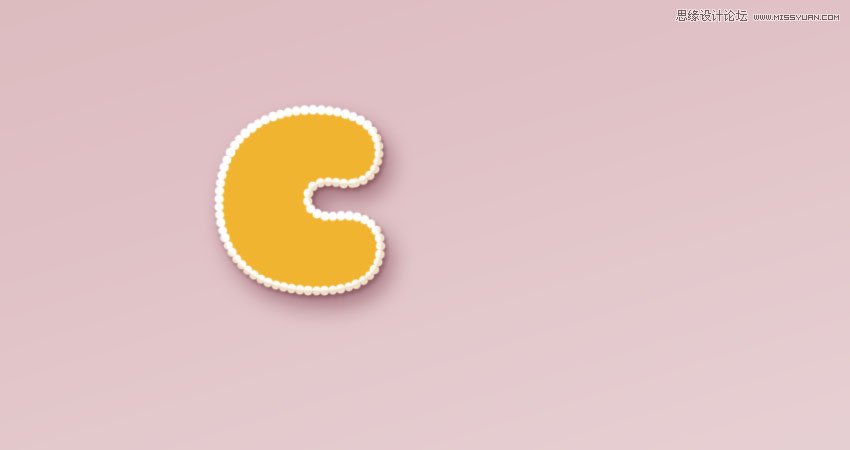
This will style the main cookie shape.
5. How to Add a Texture Image
Step 1
Open the Biscuits image, and pick the Elliptical Marquee Tool to select one of the cookies in the image. You can select only the part you want to use as well.
Go to Edit > Copy to copy the selected part.

 ��ǵ���
-
 Photoshop������(f��)���L(f��ng)�������ƬЧ����Ӣ��2018-04-23
-
 Photoshop�ϳ��L(zh��ng)����(chu��ng)����(sh��)���L(zh��ng)�i¹��Ӣ��2018-04-23
-
 Photoshop�ϳɱ�����Ч�Ľ��~(y��)��(ch��ng)����Ӣ��2018-02-10
-
 Photoshop�ϳɉ�(m��ng)���L(f��ng)���ɭ�ֈ�(ch��ng)����Ӣ��2018-02-10
-
 Photoshop�ϳ�����ʩ��������Ӣ��2018-02-10
-
 Photoshop���������|(zh��)�е�3D���w�֡�Ӣ��2018-01-09
-
 Photoshop�O(sh��)Ӌ(j��)����ȼ��ˇ�g(sh��)�ֽ̡̳�Ӣ��2018-01-09
-
Photoshop������(f��)���L(f��ng)�������ƬЧ����Ӣ��
���P(gu��n)����11882018-04-23
-
Photoshop�ϳ��L(zh��ng)����(chu��ng)����(sh��)���L(zh��ng)�i¹��Ӣ��
���P(gu��n)����13832018-04-23
-
Photoshop�ϳɱ�����Ч�Ľ��~(y��)��(ch��ng)����Ӣ��
���P(gu��n)����34052018-02-10
-
 Photoshop�����S���|(zh��)�����w�֡�Ӣ��
���P(gu��n)����7422018-02-10
Photoshop�����S���|(zh��)�����w�֡�Ӣ��
���P(gu��n)����7422018-02-10
-
 Photoshop�����@�G����3D���w��
���P(gu��n)����14682018-02-10
Photoshop�����@�G����3D���w��
���P(gu��n)����14682018-02-10
-
Photoshop�ϳɉ�(m��ng)���L(f��ng)���ɭ�ֈ�(ch��ng)����Ӣ��
���P(gu��n)����24492018-02-10
-
Photoshop�ϳ�����ʩ��������Ӣ��
���P(gu��n)����8372018-02-10
-
 Photoshop������(f��)���p���ع����w
���P(gu��n)����6532018-01-09
Photoshop������(f��)���p���ع����w
���P(gu��n)����6532018-01-09
