Photoshop��������Ү�d��߹ⱳ����Ӣ��(5)
����Դ�� Tutsplus�����x���� Marko Kožokar �o�҂����������ʵ����£�Step 17
Set the foreground color to #000000, go to Edit > Fill, and set the Contents to Foreground Color, Mode to Normal, and Opacity to 100% as shown below:

Step 18
Now go to Filter > Noise > Add Noise. Set the Amount to 2% and Distribution to Uniform, and check the Monochromatic option as shown below:

Step 19
Change the Blending Mode of this layer to Screen.

7. How to Create a Color Look
Step 1
In this section, we are going to add a nice color look to the design. Select the Dust_1 layer, go to Layer > New Adjustment Layer > Curves to create a new curves adjustment layer, and name it Color_Look_1.

Step 2
Now Double-click on this layer thumbnail and in the Properties panel use the settings below:

Step 3
Select the Dust_1 layer, go to Layer > New Fill Layer > Solid Color to create a new solid color fill layer, name it Color_Look_2, and set the color to #578cba.

Step 4
Change the Blending Mode of this layer to Soft Light.

Advertisement
8. How to Crop the Image
In this section, we are going to crop the image to cut some empty area of the design. Choose the Crop Tool (C) and transform the Crop Box as shown below:

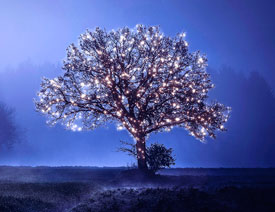
You Made It!
Congratulations, you have succeeded! Here is our final result:

 ���㲻Ҫ��
-
 Photoshop�������L�������ƬЧ����Ӣ��2018-04-23
-
 Photoshop�ϳ��L����������L�i¹��Ӣ��2018-04-23
-
 Photoshop�ϳɱ�����Ч�Ľ��~������Ӣ��2018-02-10
-
 Photoshop�ϳɉ����L���ɭ�ֈ�����Ӣ��2018-02-10
-
 Photoshop�ϳ�����ʩ��������Ӣ��2018-02-10
-
 Photoshop���������|�е�3D���w�֡�Ӣ��2018-01-09
-
 Photoshop�OӋ����ȼ��ˇ�g�ֽ̡̳�Ӣ��2018-01-09
-
Photoshop�ϳɉ����L���ɭ�ֈ�����Ӣ��
���P����24492018-02-10
-
 Photoshop�����ǹ��b�ʥ�Q�䡾Ӣ��
���P����6472017-12-16
Photoshop�����ǹ��b�ʥ�Q�䡾Ӣ��
���P����6472017-12-16
