Photoshop����ë����ʥ�Q�����w��Ӣ��(4)
����Դ�� Tutsplus.com�����x���� Rose �o�҂����������ʵ����£�5. How to Stroke Work Paths
Step 1
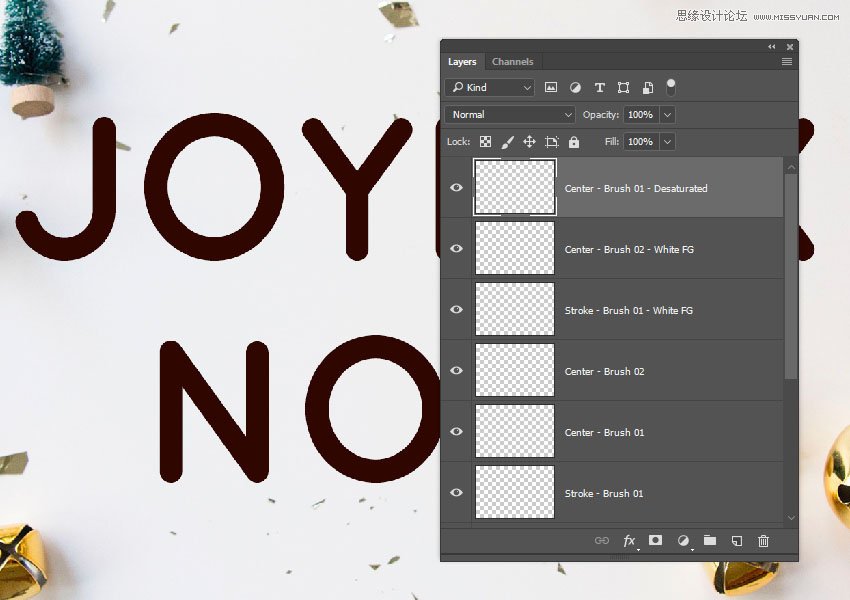
We will create six new layers that will be used to create the main tinsel effect, and we will name them according to what they will contain. So it is important to name the layers as mentioned below to follow the tutorial easily.
The names from bottom to top are:
Stroke - Brush 01
Center - Brush 01
Center - Brush 02
Stroke - Brush 01 - White FG
Center - Brush 02 - White FG
Center - Brush 01 - Desaturated
Step 2
Put all the new layers in a group and call it Tinsel, and set the Foreground Color to #d9001f and the Background Color to #300600.

Step 3
Open the Paths panel, and for each layer, select the path in the layer's name, and stroke it with the brush tip mentioned along with it.
So if you select the Stroke - Brush 01 layer, you'll need to click the Stroke work path in the Paths panel, pick the Brush Tool and choose the Brush 01 tip, and hit the Return key to stroke the path.

Step 4
To quickly switch between the brush tips, you can right-click anywhere to get the preset and choose the tip you need.

Step 5
Make sure to set the Foreground Color to White before you stroke the two layers that have White FG in their name.

Step 6
Change the Foreground Color back to #d9001f before creating the Center - Brush 01 - Desaturated layer's stroke.

 ���㲻Ҫ��
-
 Photoshop�������L�������ƬЧ����Ӣ��2018-04-23
-
 Photoshop�ϳ��L����������L�i¹��Ӣ��2018-04-23
-
 Photoshop�ϳɱ�����Ч�Ľ��~������Ӣ��2018-02-10
-
 Photoshop�ϳɉ����L���ɭ�ֈ�����Ӣ��2018-02-10
-
 Photoshop�ϳ�����ʩ��������Ӣ��2018-02-10
-
 Photoshop���������|�е�3D���w�֡�Ӣ��2018-01-09
-
 Photoshop�OӋ����ȼ��ˇ�g�ֽ̡̳�Ӣ��2018-01-09
-
Photoshop�������L�������ƬЧ����Ӣ��
���P����11882018-04-23
-
 Photoshop�����S���|�����w�֡�Ӣ��
���P����7422018-02-10
Photoshop�����S���|�����w�֡�Ӣ��
���P����7422018-02-10
-
 Photoshop�����@�G����3D���w��
���P����14682018-02-10
Photoshop�����@�G����3D���w��
���P����14682018-02-10
-
 Photoshop�������p���ع����w
���P����6532018-01-09
Photoshop�������p���ع����w
���P����6532018-01-09
-
 Photoshop����ľ�ذ�LOGO��ӡЧ����Ӣ��
���P����19272018-01-09
Photoshop����ľ�ذ�LOGO��ӡЧ����Ӣ��
���P����19272018-01-09
-
Photoshop���������|�е�3D���w�֡�Ӣ��
���P����4612018-01-09
-
Photoshop�OӋ����ȼ��ˇ�g�ֽ̡̳�Ӣ��
���P����7612018-01-09
-
 Photoshop�����Ż���M�ɵ�ˇ�g�֡�Ӣ��
���P����3802018-01-09
Photoshop�����Ż���M�ɵ�ˇ�g�֡�Ӣ��
���P����3802018-01-09
