Photoshop����ľ�ذ�LOGO��ӡЧ����Ӣ��(3)
����Դ�� Tutsplus�����x���� Tom Piccarreda �o�҂����������ʵ����£�Step 7
Now that the badge is 100% vector shapes, we can remove the white area. Choose the Magic Wand Tool, and move the cursor over a white area and click to select all the white areas of the badge. If you need, magnify the canvas by using the Zoom Tool (Z). When all the white areas of the badge are selected, remove them by choosing, in the top menu, Edit > Cut.

3. How to Include the Badge in the Scene
Step 1
We're still in the Adobe Illustrator workspace. If the badge is not selected, select it by clicking on it with the Selection Tool (V). Copy the badge by going to Edit > Copy or pressing Command-C.

Step 2
Go back to Photoshop, and double-click on the Smart Objects thumbnail. This will open the content of the smart object in a new window of Photoshop. Here you can make any changes you like and, once you're satisfied, all you need to do is save the file and the Photoshop Smart Object will be updated when you return to it.
In the Layers panel, deactivate the visibility for the yellow rectangle layer, and paste the badge just copied by choosing Edit > Paste or pressing Command-V.
From the dialog box, choose Smart Object and press OK:

Step 3
Locate the top options bar and set the badge's position to 633.50 x 406.50 px and its dimension to 666% for both Width and Height fields. When you're done, press ENTER on your keyboard:

Step 4
Save the document by choosing File > Save or using the keyboard shortcut Command-S.
Go back to the main document and you'll notice that the smart object is now updated with the last changes. The badge, in fact, has taken the perspective of the smart object.

4. How to Engrave the Badge Into the Wood
Step 1
Set the Fill for the "Smart Object" layer to 0%:

Step 2
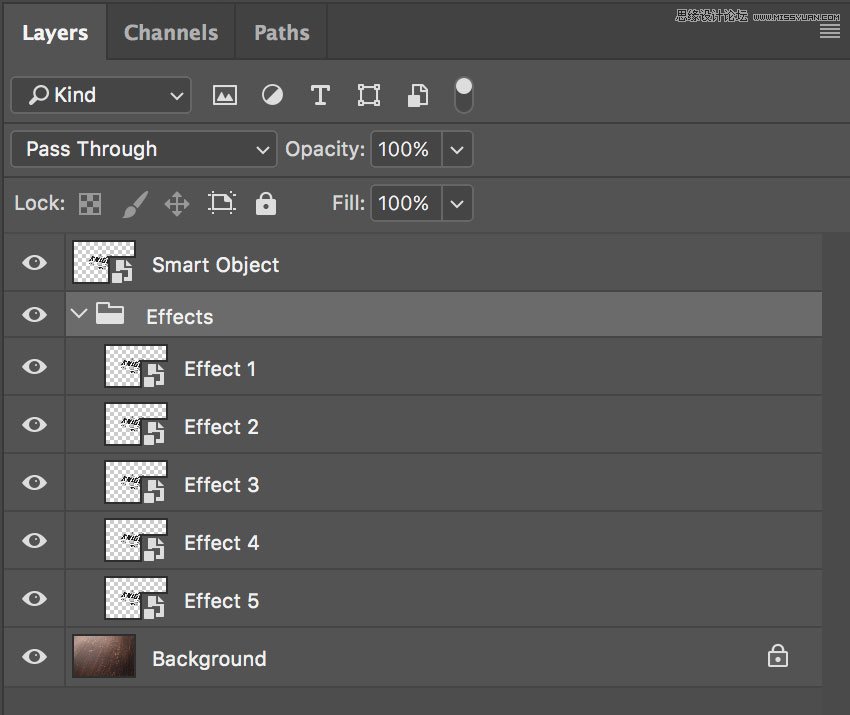
Duplicate the "Smart Object" layer five times by going to Layer > New > Layer Via Copy.
Now rename and group the layers as shown in the image below.
From now on, when you need to replace the badge in your smart object, you can use the "Smart Object" layer, by clicking on it and editing the content.

Step 3
Let's start adding some layer styles to the "Effect 5" layer. Open the Layer Style panel and add a new Bevel & Embossed effect. Set the color for the Highlight Mode to #ffffff, the color for the Shadow Mode to #000000, and set the rest as follows:

Step 4
Add a new Inner Shadow effect, set the color for the Blend Mode to #000000, and set the rest as follows:

 ���㲻Ҫ��
-
 Photoshop�������L�������ƬЧ����Ӣ��2018-04-23
-
 Photoshop�ϳ��L����������L�i¹��Ӣ��2018-04-23
-
 Photoshop�ϳɱ�����Ч�Ľ��~������Ӣ��2018-02-10
-
 Photoshop�ϳɉ����L���ɭ�ֈ�����Ӣ��2018-02-10
-
 Photoshop�ϳ�����ʩ��������Ӣ��2018-02-10
-
 Photoshop���������|�е�3D���w�֡�Ӣ��2018-01-09
-
 Photoshop�OӋ����ȼ��ˇ�g�ֽ̡̳�Ӣ��2018-01-09
-
 Photoshop�������L�������ƬЧ����Ӣ��
���P����11882018-04-23
-
 Photoshop�ϳ��L����������L�i¹��Ӣ��
���P����13832018-04-23
-
 Photoshop�ϳɱ�����Ч�Ľ��~������Ӣ��
���P����34052018-02-10
-
 Photoshop�����S���|�����w�֡�Ӣ��
���P����7422018-02-10
-
 Photoshop�����@�G����3D���w��
���P����14682018-02-10
-
 Photoshop�ϳɉ����L���ɭ�ֈ�����Ӣ��
���P����24492018-02-10
-
 Photoshop�ϳ�����ʩ��������Ӣ��
���P����8372018-02-10
-
 Photoshop�������p���ع����w
���P����6532018-01-09
